Google Reader Enhancements
Among all Google services Reader could be the only one for me that doesn't have a good alternative. I can use Bing for searching, Outlook for mail, BingMaps for maps etc but when it comes to an RSS Reader I don't know any good service out there with the same functionality as GReader. Yes, there are some popular services like Feedly and Flipboard but they seem like a newspaper and are only good for reading handful of articles and not very useful for skimming hundreds or thousands of them. Google Reader is very good for this, but it has few shortcomings, like you have to mark all the post from a source as read without leaving half of them as unread, this is fine as long as there are only 40-50 posts, but what about if there are hundreds of them. Another problem with Google Reader is there are too much white space, even if you choose compact view.Luckily for us there are userscripts to solves these problems.
Userscripts:
For selective marking I recommend "Mark previous as read"
For extra white space there are two userscripts: "Google Reader Fixes" and "Google Reader Absolutely Customizable". You can install both of them.
After you install all of these userscripts Google Reader will look as above, with much more content on screen.
Bonus script: Google Reader Unread Count, by default you cannot see how many unread posts you have, this script will show you the exact count.
Note that you need GreaseMonkey addon installed beforehand on Firefox to install these scripts. If you are using Chrome you don't need GreaseMonkey, it supports userscripts by default, but you cannot install them from 3rd party sources like userscripts.org. To do that you should add the following argument to your on your Chrome shortcut in where it says target "--enable-easy-off-store-extension-install" just after chrome.exe.
also: my wishlist for GoogleReader
Installing Applications on Ubuntu/Mint
There are several ways to install an application on Linux; you can either compile it from source code, you can find the application in prepackaged deb/rpm file and use a package resolver (you can think of it like msi files on Windows), or you can use a package manager.1 - Compiling from source code:
This is obviously the hardest option, if you are not doing custom configurations on the code - and since you are reading this post it's not likely that you do - this should be the last resort.
The first thing you should do is to install the build-essentials - basic tool chain that will be used for compiling source code. You will acquire the source code of an application in an archive format (tar, zip, tar.bz2 etc.) You need to extract the contents from the archive to a folder. Both Ubuntu and Mint come with an archive manager, so you can just right click and select extract. If the developer is kind enough you will find a readme or install file among the extracted contents that is giving information about how to install the application. If there is one just follow the instructions there, if not try the below commands:
Open up terminal (ctrl+alt+t) and navigate to the source folder, and then type
./configure
make
sudo make install
If there is a problem you will see the possible cause of it on terminal screen, if it is missing dependency you can just install it and then try again, or else you can google it along with the application name.
2-Another option is to download prepackaged files, in case of Ubuntu/Mint deb (debian) files. If your configuration satisfies the required packages then you can install these deb files by either double clicking and installing them by using the default deb handler (gdebi or Ubuntu Software Center) or by going to terminal and typing:
dpkg -i package.deb
3-Another and probably the easiest option for newcomers is to use a package manager like Synaptic or something like Ubuntu Software Center. There you just search for your application and click install without having worrying any dependencies. After sometime when you get used to using the terminal you can install applications from there by typing:
apt-get install package
How to Enable Broadcom Drivers on Ubuntu and Mint without a Wired Connection
Both Ubuntu and Mint do not have a problem a wired connection like other Linux distros, and they work without any need for a configuration. But if you don't have a wired connection, all you have is a wireless network, you will need to install the required wireless drivers first.This instructions are for Broadcom drivers only.
Linux Mint:
On Mint you will be greeted with an option to install the restricted drivers on first boot, but in order to install them via that screen you need to have an Internet connection first, which is kind of counter intuitive. Fortunately if you know where to look, the drivers are already on your drive for you to install.
You just need to enable local repositories by removing the comment sign "#" in /etc/apt/sources.list.d/local-repository.list file. Then open restricted drivers settings and click activate. Optionally you can install the driver manually by typing:
sudo dpkg -i /usr/share/local-repository/binary/dkms_2.2.0.3-1ubuntu3_all.deb
sudo dpkg -i /usr/share/local-repository/binary/bcmwl-kernel-source_5.100.82.38+bdcom-0ubuntu6_i386.deb
Ubuntu:
Likewise on Ubuntu you can find the restricted Broadcom driver in /media/cdrom/pool/restricted/b/bcmwl folder. But before you can install it, you will need to install another package, dkms, which you can find in /media/cdrom/pool/main/d/dkms folder. For your convenience you can use below commands to install them in correct order:
sudo dpkg -i /media/cdrom/pool/main/d/dkms/dkms_2.2.0.3-1.1ubuntu1_all.deb
sudo dpkg -i /media/cdrom/pool/restricted/b/bcmwl/bcmwl-kernel-source_5.100.82.112+bdcom-0ubuntu2_i386.deb
PS: Online repository for this driver is here.
After you install them type below commands to load the driver:
sudo modprobe -r b43 ssb wl
sudo modprobe wl
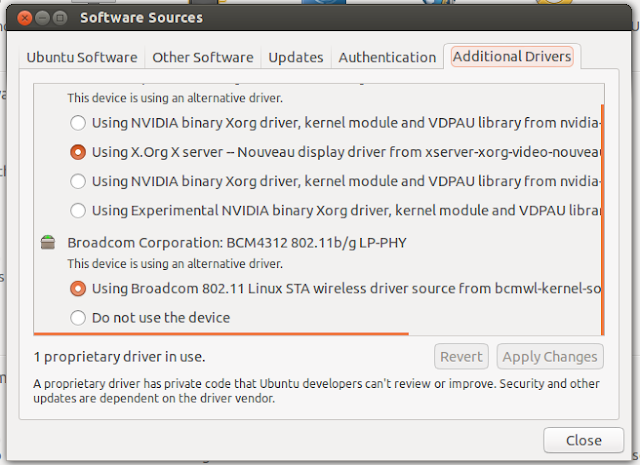
You can also apply the drivers by calling Software Sources from dash (press Win key and type software sources). Then go to Additional Drivers, select your driver and click apply changes.
how to install applications/drivers
One more option is to download the tar file directly from Broadcom and compile it yourself. This driver can be used with Broadcom's BCM4311-, BCM4312-, BCM4313-, BCM4321-, BCM4322-, BCM43224-, and BCM43225-, BCM43227- and BCM43228-based network chips.
How to Create a Live USB Linux Without a Hard Drive
After my hard drive crashed the only option left for me to use my computer before buying a new hard drive was to boot from a liveCD. That way I could at least do some basic stuff like surfing the Internet or read and write some papers. But the problem was I haven't got any Linux CDs with me. I had downloaded dozen of Linux distros to try them on virtual machine, but didn't burn any of them to CD. Then I thought about installing Linux on my USB sticks. I downloaded Damn Small Linux and Mint at school, and couple of programs to install them, but then I found out that all these programs needed an administrator account which I didn't have, since I was using a public computer. When I got home I came up with the idea of booting up from my Windows setup disk and use the DOS prompt for installing the Linux images to my USB.Here is how I have done it:
 On initial setup Windows loads its files onto RAM and only after your configurations for drive partitions it starts copying these files. So in essence I had a minimal Windows setup with basic tools that I could use to create my live USB.
 As soon as you get the graphical screen shown on left you can fire up MS-DOS and do what you like. (Once you get this screen you can even insert another CD - one with your Linux images maybe - , you don't need Windows setup disk on your CD drive from here on) This can be accomplished my pressing SHIFT+F10 or if you forget this combination you can use the repair menu to get the command prompt. You can get there by first clicking "Repair your computer" then on second step click the first radio button that says "use recovery tools ..." and continue by clicking next.

When you get to the command prompt, it is quite easy to proceed. First I had to find out the drive labels of my USB sticks, and found out that one of my sticks was assigned to c, dvd-drive was on d, and the other stick was assigned to label e.
I formatted the stick (c:) I was planning to install Linux by typing:
format c:
then navigated to the other one to open the program for the installation.
you can change the drive by typing its label i.e. e:
you can list the contents of the drive by typing dir
and you can open any program by typing its name, once you typed the first few letters you can make cmd to auto complete the name for you by pressing tab key.
The program I choose for installation was Unetbootin.
 Its usage is very straightforward. You just locate the ISO image, choose the drive label and if you want to preserve your settings between reboots, you can create a file on USB for persistence. Then just click OK and wait for it to write the image on your stick.
 Then all you have to do is to enable booting up from USB on your BIOS settings.
All these process may seem complicated, but it's actually quite easy to accomplish.
Be Prepared for a Hard Drive Disaster
I learned my lesson, and from now on I will frequently use online storage services to back up my files.
- License and activation: This may not seem necessary if you have a setup disk or setup image, but the product key on Windows sticker fades in time or gets wiped up, and since your hard drive is broken you cannot access your setup image either. Luckily I have uploaded the activation file on my SkyDrive. I have also took a picture of the product key, and wrote it on a file, but I haven't uploaded those, and they are gone. You can use ABR (Activation Backup and Restore) for backing up your activation.
- Personal Photos: There are dozens of reliable places online that you can upload and store your photos. Both Picasa and Windows Live Photo Gallery have options for uploading and syncing features. You can be sure that both Google and Microsoft's services will outlive your hard drive.
- Documents: Again comes Microsoft and Google with their SkyDrive and GoogleDocs where you can not only store your documents but can edit them too. They both support doc and xls files.
- Notes: There are hundreds of note taking applications, both online and offline. My favourite one is Evernote, for it is free and have a desktop application in sync with its webapp.
- Music: If most of your music files are generic songs and not custom dub mixes and your job is easy. You either directly upload all your files to GoogleMusic (if you live in USA), SkyDrive, Amazon CLoud Storage or DropBox and listen from there or you can create playlists online without a need of uploading. There is one disadvantage of online playlists, you cannot listen them from your mobile phone for free, or at least this music will eat from your monthly data limit. I am using three services for preserving my music preferences and listen it. Spotify and Grooveshark for music on demand, and Last.fm for scrobbling and listening in a more random way.
- Videos: You can upload your videos to YouTube and at the same time burn them to a bootable DVDs that could be played without a hard drive. There is a program called MoviX you can use for that purpose, it is a minimal Linux distribution for creating a live multimedia cd. Note that CDs and DVDs are even more unreliable than hard drives.
- Passwords: I am using LastPass to store almost all passwords for my various websites.
- Program Settings and Game Saves: Regular settings are generally not important to backup, but if you are using plugins and heavy customization it would be good to back them up. You can use DropBox for that.
- Programs: Instead of backing up programs I think it would be better to back up a list of them.
- LiveCD: Have a liveCD or bootable USB drive with a Linux on it, just in case.
Subscribe to:
Posts
(
Atom
)


No comments :
Post a Comment